You know your Amazon listing needs work, but where do you actually start, and in what order? This is the step-by-step process to optimize a product listing from top to bottom, the same sequence experienced sellers follow. Work through it in order and you’ll fix the highest-impact elements first instead of guessing.
Quick Answer
To optimize an Amazon product listing: start with keyword research, write a keyword-led title, fix your main image, write benefit-first bullets, build out the description or A+ content, fill your backend keywords, and then track results and refine. Work in that order, title and main image carry the most weight.
Key Takeaways
- Start with keyword research, it informs everything else.
- Title and main image are the highest-impact fixes.
- Bullets should sell benefits, not just list features.
- Backend keywords are quick, free indexing wins.
- Optimization is a cycle: change, measure, refine.
Table of Contents
- Step 1: Keyword Research
- Step 2: Write the Title
- Step 3: Fix the Main Image
- Step 4: Write the Bullets
- Step 5: Description and A+
- Step 6: Backend Keywords
- Step 7: Track and Refine
- FAQs
Step 1: Start With Keyword Research
Before touching a word of copy, find the terms shoppers actually use. Pull keywords with real search volume and buyer intent, then sort them by priority. The highest-volume, most-relevant term becomes your title anchor; supporting terms get spread across bullets; the rest go to backend search terms. Everything downstream depends on getting this right, so don’t skip it.
Step 2: Write a Keyword-Led, Readable Title
Lead with your most important keyword, add your brand, then cover the attributes a shopper needs to decide: size, quantity, material, use case. The test: does it read like a human wrote it, or like a keyword dump? A title that ranks but reads badly will lose the click anyway.
Step 3: Fix the Main Image
Your main image decides whether anyone clicks at all. It must be a clean product shot on a pure white background, with the product filling most of the frame, high resolution, and zoom-enabled. This is the single biggest lever on click-through rate, which is why it comes before the deeper copy work.
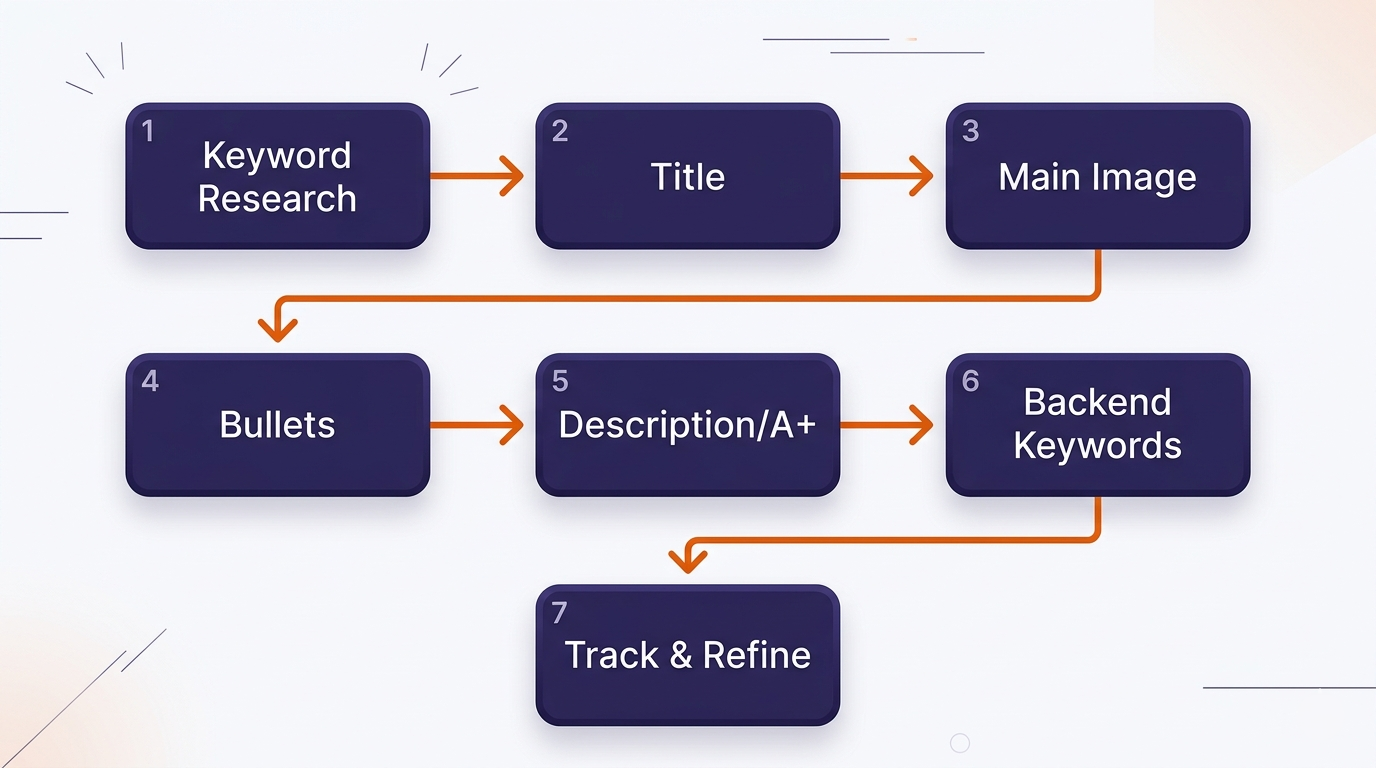
Step 4: Write Benefit-First Bullets
Use all five bullets. Lead each one with the benefit, then back it with the feature. “Keeps drinks cold for 24 hours” before “double-walled vacuum insulation.” Put your strongest selling point in bullet one, work secondary keywords in naturally, and answer the objections that stop people buying.
Step 5: Build the Description or A+ Content
If you have Brand Registry, use A+ Content with formatted modules, comparison charts, and lifestyle images. If not, write a description that tells a story and answers deeper questions rather than repeating your bullets. Either way, write in plain language that answers real shopper questions, which also helps Amazon’s Rufus AI understand and surface your product.
Step 6: Fill Your Backend Keywords
Use the hidden search term field fully. Add synonyms, alternate spellings, and related phrases you couldn’t fit naturally into your visible copy. Don’t repeat words already in your title, don’t use competitor brand names, and skip commas. This is free indexing most sellers leave half-empty.
Step 7: Track Results and Refine
Optimization is not one-and-done. After your changes go live, watch your conversion rate and keyword ranking over the following weeks. Test a new main image, rewrite an underperforming bullet, add keywords you’re missing. The listings that win are the ones that get revisited.
If working through all seven steps across multiple products is more than you have time for, that’s what we do. Our Amazon listing optimization service runs this full process for you, and you can see the results on our client results page.
Related Reading
Frequently Asked Questions
What order should I optimize my Amazon listing in?
Start with keyword research, then title, then main image, then bullets, description, and backend keywords, and finish by tracking and refining. Title and main image carry the most weight, so prioritize them.
How long does it take to optimize a listing?
A thorough optimization of one listing typically takes 7–14 days including keyword research, copywriting, and image work. Simple changes like a new title can be done in an afternoon, but the full process is deeper.
What’s the single most important element?
The main image for clicks and the title for ranking. A great listing needs the whole package, but if you fix one thing first, fix your main image, it determines whether shoppers click at all.
Can I optimize a listing without Brand Registry?
Yes. Title, main and gallery images, bullets, and backend keywords are all editable without it. Brand Registry adds A+ Content and a few tools, but strong optimization is achievable without it.
How do I know if my optimization worked?
Watch your conversion rate and keyword ranking in the weeks after the change. A higher conversion rate and improved ranking for target terms are the signs it worked. Give it a few weeks, since ranking changes lag behind conversion improvements.
Written by the AMZ Scaler Team
Amazon advertising and listing specialists with 5+ years managing PPC and listing optimization for brands across the US, UK, and Canada. We publish what we apply in real seller accounts every day.